- What is Whimsical?
- Getting started with flowcharts
- Getting started with mind maps
- Getting started with wireframes
- What can you do with Whimsical?
- Using Whimsical Boards
- Working with Whimsical’s infinite canvas - video guide 🎥
- 5 ways to create a new file
- Getting started with Whimsical AI
- How to create a new workspace
- How to use AI-assisted mind mapping
- Customizing file and folder icons
- Mentions in Whimsical files
- Customizing diagram shapes
- Getting started with sequence diagrams
- Using the command menu
- Commenting in Whimsical files
- Getting started with flowcharts
- Getting started with mind maps
- Getting started with wireframes
- Using Whimsical Boards
- Mentions in Whimsical files
- Customizing diagram shapes
- Using sections on the Whimsical canvas
- Sketch on the canvas with freehand drawing
- Annotating files for more detail
- Text-to-object pasting options
- Adding and displaying links in Whimsical files
- Linking to sections and objects
- How to draw a line
- How to filter selected objects
- Presenting in Whimsical
- Using the timer in boards
- Working with the grid and auto-alignment
- Working with connectors
- Does Whimsical have cloud architecture icons?
- Using tables in Whimsical
- Using sticky notes in boards
- Optimizing performance in larger boards
- Using spellcheck
- Setting custom thumbnails
- How overlays work in Wireframe mode
- Hiding cursors while collaborating
- Measure between objects in Boards
- Uploading files to Whimsical
- Getting started with sequence diagrams
- Working with Mermaid code in Whimsical
- How to create a new workspace
- Requesting file access
- Workspace discovery settings
- Sorting files and folders
- Changing workspace members’ roles
- Adding and removing members
- Creating and managing teams
- Requesting workspace editor access
- Linking between files
- Member roles in Whimsical
- How to delete a workspace
- How to upgrade your workspace
- Guest access
- Changing your workspace name, logo, or URL
- Offboarding users
- Consolidating workspaces
- Uploading files to Whimsical
- Organizing your work with tabbed folders
- SAML
- Setting up SAML session expiry
- Security
- Prevent new workspace creation
- Customizing file and folder icons
- How to draw a line
- How to filter selected objects
- Does Whimsical have cloud architecture icons?
- How overlays work in Wireframe mode
- Moving and copying files
- Using Whimsical on mobile
- Does Whimsical have a dark mode?
- File version history
- Why are the colors of some elements toned down?
- Does Whimsical support offline mode?
- Teams, workspaces & sections explained
- Does Whimsical work on iPad?
- Free viewers commenting in workspaces
- Whimsical desktop app
- Is Whimsical available in other languages?
- Inverting the zoom direction in Whimsical so it works more like Sketch
- Troubleshooting issues and reporting bugs
- How to add emojis
- Team FAQs
- How to restore deleted files from the trash
- Searching in your Whimsical workspace
- Organizing files in your workspace
- I’ve upgraded but still don’t have access to the paid features
- Why can't I edit my files?
- Reporting content in Whimsical
- Does Whimsical have an affiliate or referral program?
- Collaborating with others in real time
- Sharing files and managing access permissions
- Hiding cursors while collaborating
- How to switch between workspaces
- Sharing feedback and feature requests
- Markdown support in Whimsical
- Embedding & integrating boards with Jira Issues
- Integrating Whimsical with Google Docs
- Embedding files in ClickUp views
- Embedding files in Asana
- Embedding Whimsical files
- Whimsical AI Diagrams for ChatGPT
- Creating Jira & Confluence Smart Links for Whimsical Files
- Embedding files in Guru
- Embedding files in Trello
- Embedding & integrating boards in Notion
- Integrating Whimsical and GitHub
- Embedding files in Zendesk
- Support Whimsical embeds in your app with EmbedKit
- Whimsical previews and notifications in Slack
- Embedding files in Canva
- Integrating Whimsical and Linear
- Embedding files in Nuclino
- Embedding files in Monday
- Embedding files in Medium
- Embedding files in Slab
- Embedding files in Coda
- Whimsical API (Beta)
- Whimsical desktop MCP (beta)
- Whimsical Remote MCP
- SAML
- SAML SSO in Whimsical
- SAML SSO with Okta
- SAML SSO with Auth0
- SAML SSO with OneLogin
- SAML SSO with Microsoft Entra ID (Azure AD)
- SAML SSO with Google Workspace (previously G-Suite)
- SAML SSO with Active Directory Federation Services (ADFS)
- SAML SSO with other identity providers
- Setting up SAML session expiry
- Managing email changes with SAML and SCIM
- SCIM
- Setting up SCIM with Okta
- Setting up SCIM with JumpCloud
- Setting up SCIM with Entra ID (Azure AD)
- SCIM provisioning with Groups in Okta
- SCIM user provisioning in Whimsical
- SCIM provisioning with Groups in Entra ID (Azure AD)
- Security
- Setting up Two-factor Authentication (2FA)
- Prevent new workspace creation
- Whitelisting Whimsical domains
- Signing in with your Whimsical account on multiple devices
- Contact us
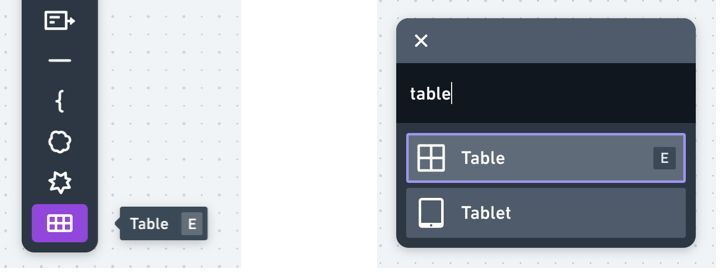
Using tables in Whimsical
If you ever need to add a little structure to a Whimsical board, you can add tables. Tables are perfect for organizing product roadmaps, comparing feature specs, tracking project timelines and more
To add a table to a Whimsical board, use the keyboard shortcut E , select it from the diagram shapes menu, or type / then table :
Tip: You can also paste a table directly from Google Sheets, Numbers, or Excel 😉
Click and drag the table to choose your starting size, and the number of columns and rows:

Adding and removing columns and rowsCopied!Link to this section
To add a single column or row, click the + icon on the right or bottom edge of the table:
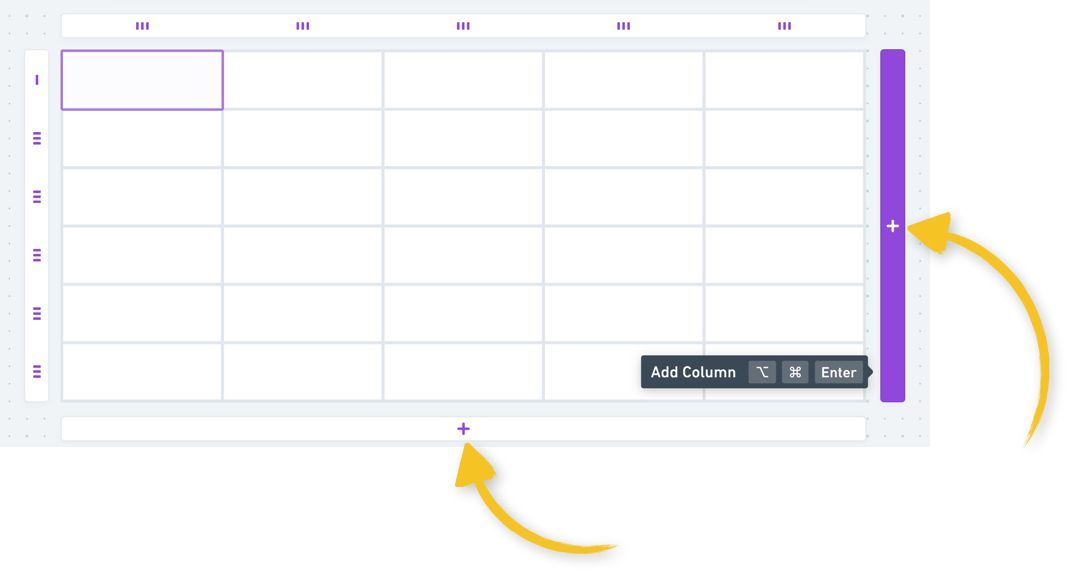
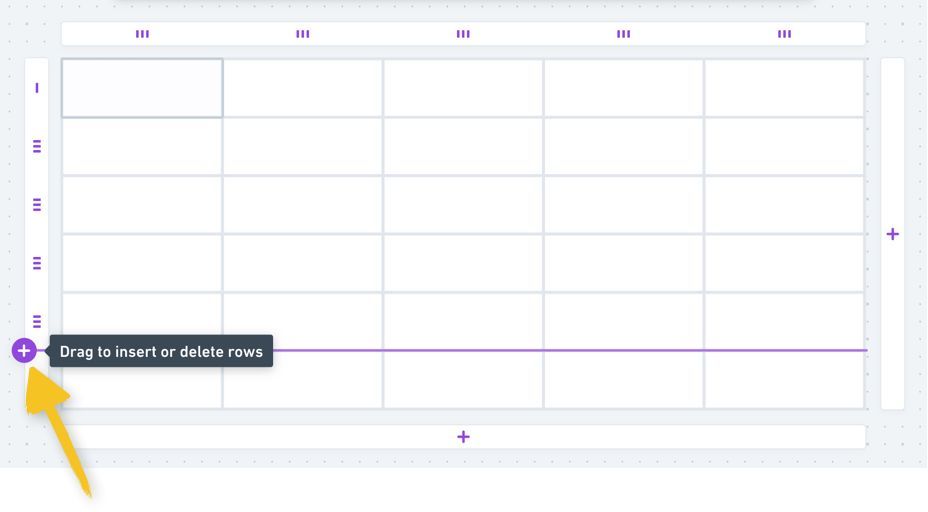
Tip: You can also add columns or rows in between existing ones, with this plus icon:
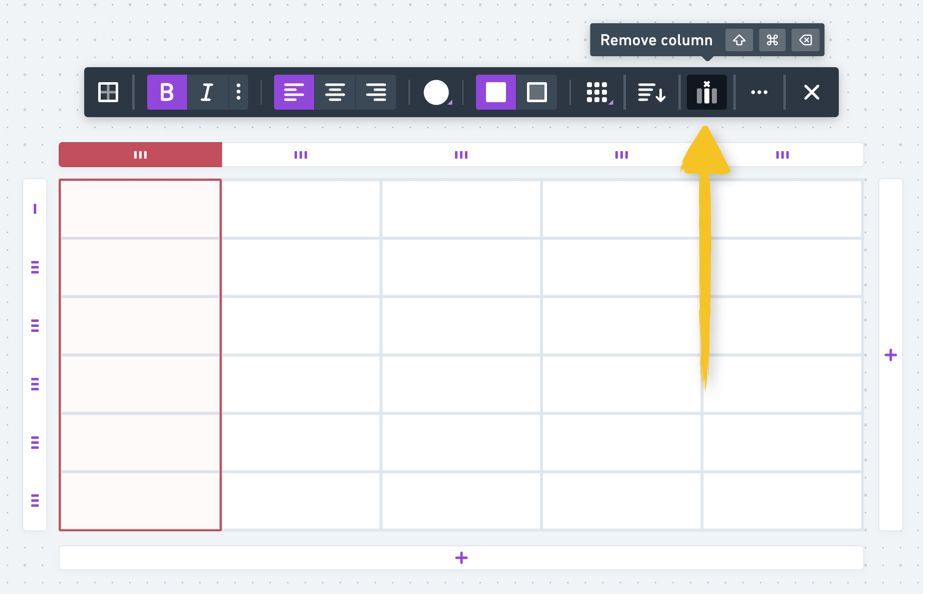
To remove a column or row, select it then click "remove column" or use the keyboard shortcut Command + Shift + Delete (Mac) or Control + Alt + Backspace (PC):
To add or remove multiple columns or rows, click and drag any of the + buttons mentioned above:

Organizing columns and rowsCopied!Link to this section
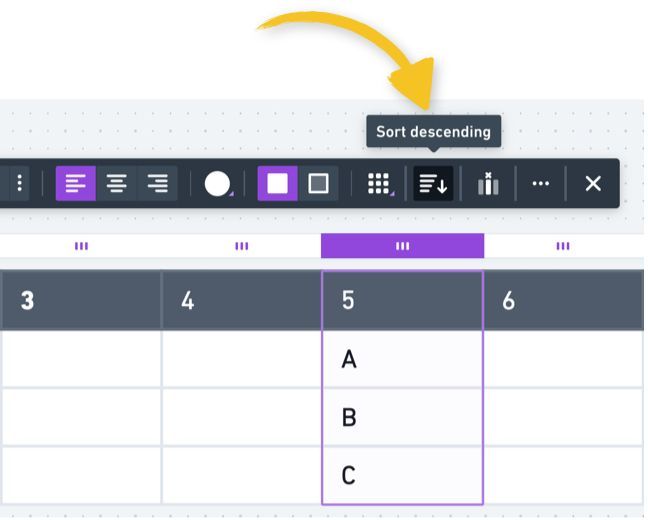
Organize your rows and columns by dragging them with the handles on the top and left:

You can also sort the contents in ascending or descending order with this icon in the toolbar:
Formatting tablesCopied!Link to this section
When you have a table, column, row or cell selected, you'll see the following formatting options:
- Background color
- Adding or removing a header row
- Choosing the table style (e.g. alternating row colors)
Tip: Whimsical table cells support rich content. Try pasting in an image, or using @ to mention a Whimsical file.
Connectors and tablesCopied!Link to this section
When you connect to a table from another shape in your board, you'll see purple outline as a guide so you can choose to connect to the table as a whole, or to an individual cell:

Note: Formulas and calculations are not supported.
